Every year, around Halloween, my daughter’s school does their “Fall Festival”, which consists of various booths and activities for the kids to do, mostly created by the kids, based on what they are learning that year. This year, for example, my daughter’s class is learning about the prehistoric peoples of the New Mexico area and so they had an activity in which people threw spears at a Mammoth, to hunt for the clan.
Last year, I did a science booth. It is a bit different than a normal demo, in which one might have a specific routine. Rather, here, the kids come up randomly, like they would any fair, and I tried to do something “on demand” to capture their attention. Ideally, they learn a bit of science too, but it is a bit too hectic to teach much. More, I’m simply hoping to show them cool things that kindle their interest in science.
I did the booth again this year. Overall, it went well, though I think it was a bit better last year, except for maybe the finale. I’m still trying to find the right set of experiments and am finding that the ideal experiments are hands-on, ones the kids can not only watch, but directly participate.

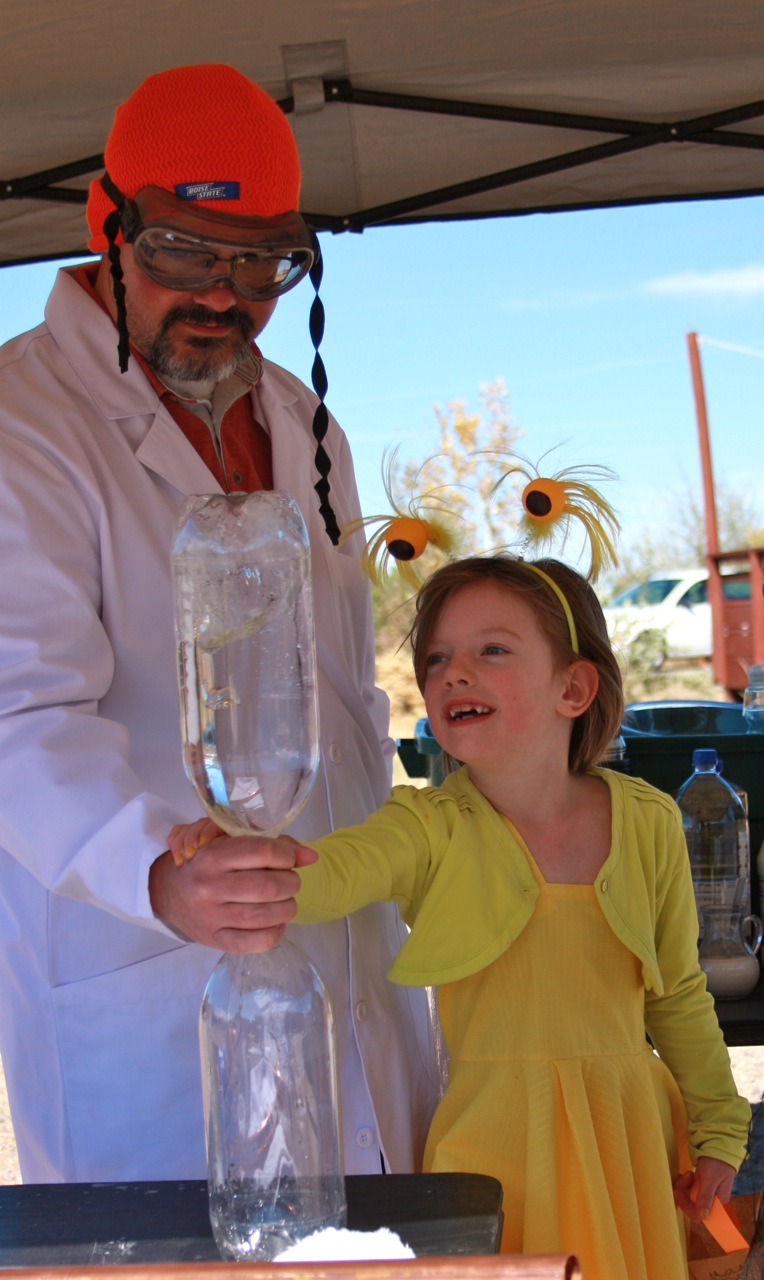
Like last year, I did Elephant Toothpaste. Basically, you mix hy drogen peroxide and yeast in a bottle and it reacts. Add some dish soap and food coloring and you get a nice foaming mess. The reaction didn’t go quite as fast as last year, I think because the hydrogen peroxide (a stronger 6% solution that you can get at hair salons) was thicker, so it didn’t mix with the yeast as fast. My water, used to activate the yeast, was also not as warm as it should have been, so the yeast wasn’t as active as it could have been. We still got an oozing foam, but it wasn’t quite as dramatic as last year.

Probably the biggest bust was the hot ice. Last year, I had ordered, but not received, sodium acetate to make hot ice, the same stuff that is in those hand warms. If you make it right (essentially just cooking the sodium acetate in hot water to make a supersaturated solution that you then cool to make it supercooled as well) and pour it out, it will instantly solidify, making a growing crystal. Mine solidified as I poured it, actually clogging my bottle, but it solidified into a big glob, not a cool crystal tower. Actually, a test at home worked better in which I just poured it all in a bowl, tapped it to seed the nucleation, and lots of thin crystals grew out. Not quite sure what I did wrong here…
Two other experiments that were new this time were the water tornado and the magnet down the copper tube. In the water tornado, you just connect two 2-liter bottles with a special adapter, one of which is filled with water. If you flip it over and give it a swish, a tornado falls. For the magnet, you simply have to drop a strong magnet down a copper tube, which is not magnetic, but the electrical currents generated by the magnet in the tube slow the magnet down so it takes many seconds to fall through. I couldn’t quite tell if the kids got into these. It almost felt like the adults liked them better, especially the magnet.
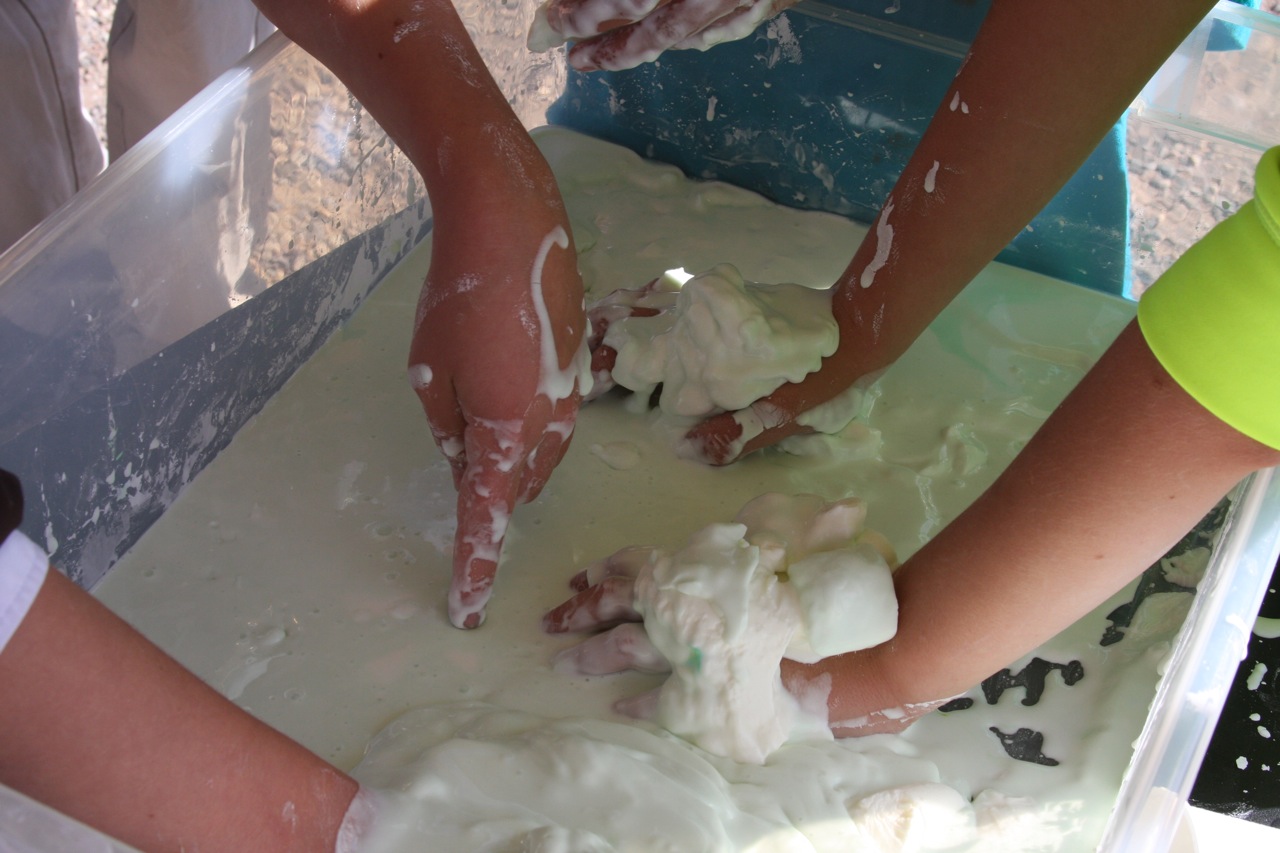
As I mentioned, hands-on turned out to be the best and most popular. I made Oobleck again (simply a 2-1 mixture of corn starch and water). Oobleck is a non-Newtonian fluid, meaning it acts differently depending on how hard you hit it. If you hit it hard, it resists like a solid. If you push slowly, your fingers go in slowly like a liquid. It’s just like quicksand, and the kids loved to play with it, even the older ones.
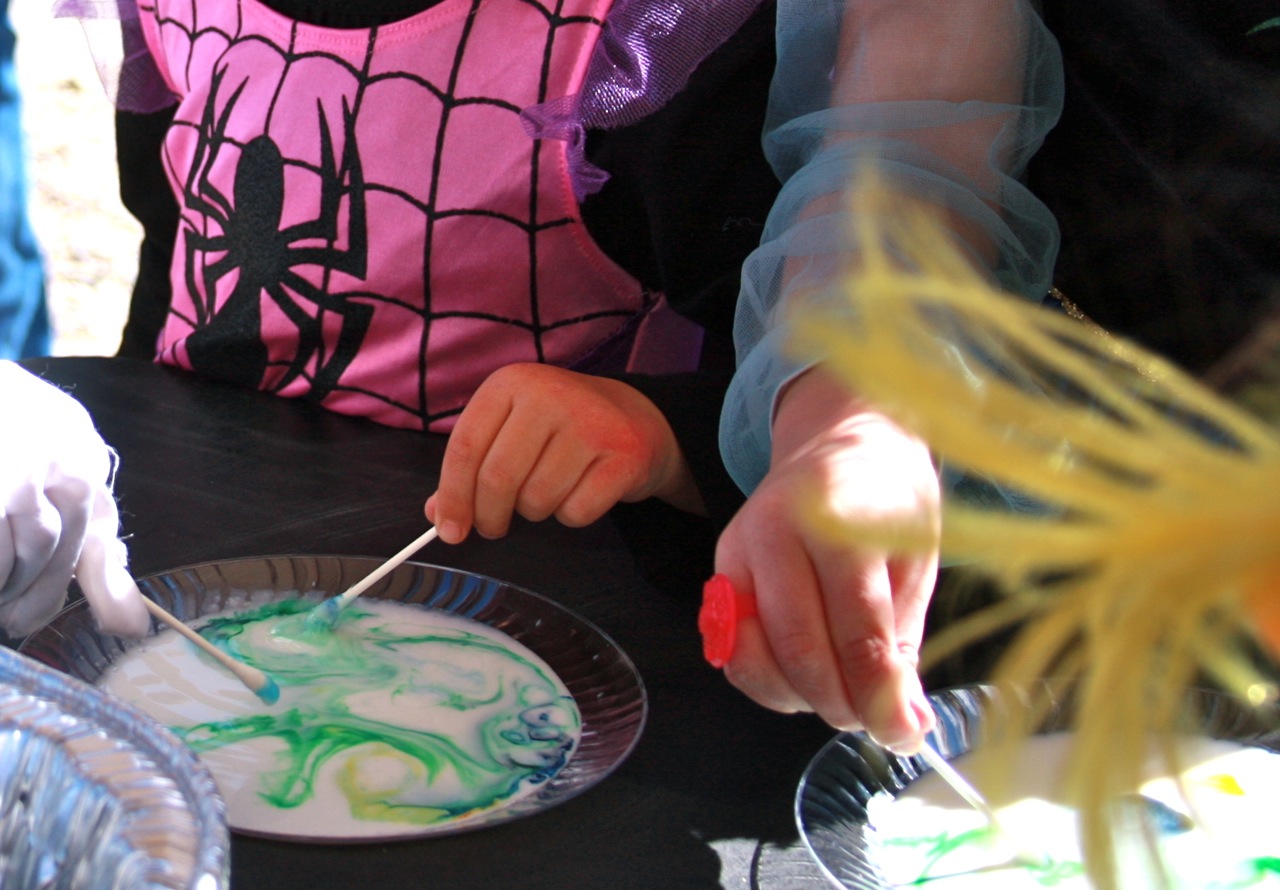
For the younger kids, I redid the milk+soap experiment. If you start with a small plate of milk, add some drops of food coloring for visual appeal, then touch the milk with a Q-tip dipped in liquid dish soap, because the soap is polar, meaning one of the soap molecules love water and the other end hates it, the soap rushes around the milk, trying to find the fat molecules in the milk to attach their hydrophobic (water-hating) end to the fat, while pushing everything around. The food coloring shows how things just zip around. You get some very pretty patterns. I think if done in a more controlled way, the kids could use this to “paint”. We’d just need to figure out how to take pictures of the final designs.

The other new experiment involved little rockets. If you take an old film canister, fill it just a bit with water (the less the better), and add half an Alka-Seltzer tablet, you get a rocket. Close the canister, place it lid down on the ground, and step back. Some of the kids were getting their rockets to go easily 15-20 feet into the air. I couldn’t supply Alka-Seltzer tablets fast enough. The second they got a rocket launched, they were right back asking for more. This appealed to both girls and boys, though not the oldest kids. It was a huge hit, though, and one that will definitely have to be repeated.
Incidentally, I couldn’t quite figure out why less water would help it go higher. Another scientist was there watching, and he figured that the pressure build-up has to be the same (that is when the rocket pops), so it is the different amount of gas that is the key. More gas means more energy. I’m not sure that fully makes sense to me, I need to think about it a bit more. But, it shows how even a simple experiment like this can be turned into a real science effort by systematically testing these kinds of parameters.

Finally, I tried to go out with a bang. I carved the school’s initials into a pumpkin and my intention was to put dry ice in a mixture of water, soap and red food coloring to have it foam out of the carved face. It didn’t quite go. I started with a container that was too big and it only foamed out the top as I couldn’t close the pumpkin well. And when I finally got it to go, at least a bit, it wasn’t red. So, it wasn’t quite as appealing and dramatic as I hoped. It was still cool, but not awesome.
Overall, though, I had fun and I think the kids had fun. Even some of the parents had fun. If I was able to inspire even a couple of kids to think about science a bit more, then it was all worth it.
If anyone has any other good ideas for hands-on experiments, or nice visual experiments that can be easily repeated through an afternoon, please let me know!